Monday, September 23, 2019

Best At-Home Gel Nails Manicure Supplies from Amazon

I recently purchased all of the tools I need for at-home gel manicures. I did my own nails for years until I discovered the convenience of gel nails at the salon. But I live in the Seattle area now and recently paid a vomit-inducing $85 for a mani-pedi. I said I'm done, I'm doing my own nails now. So I did some research and ordered a bunch of highly-rated products on Amazon. I did my own manicure in under an hour late Saturday night and have been as excited as a schoolgirl ever since.

To do your own at-home gel manicure, you need a UV/LED lamp, polish, removal products, and nail/cuticle/filing tools. I'm all about kits, so I found all of these in a total of 4 purchases, plus a visit to the store for acetone and rubbing alcohol.

1. UV/LED lamp - $40
This was challenging to find because the prices for these range from $10 to $300. I finally decided on this one due to its full size, LED lights (LED is better than UV) and long list of positive ratings and reviews. My finding: This is perfect. Its lights are strong, the housing is durable with a real metal base attached by magnets, and the operation is simple with clearly-labeled buttons on the back. I was able to cure my entire hand in it, I didn't need to do thumbs separately.


2. Nail polish, top coat, base coat - $30
There are a ton of brands out there and I've tried many at the salons. I wanted to start small though without investing hundreds of dollars right off the bat. Modelones has a lot of good reviews and I just wanted something that worked. You also need both a base coat and a top coat for gel manicures to work, so I found this kit that has 16 colors AND the top/base coats. The glitter colors are too sheer for my liking, but I think they were probably intended to be layered over another color. I'll try that next time. Otherwise, they cured hard and went on smoothly. I wish the brushes were rounded like some brands do, but these worked just fine for a budding at-home manicurist. The box is really nice too.

3. Gel polish removal kit - $10
I had gel polish on from my $85 manicure 3 weeks ago (😖) so of course, I needed to remove it. I decided I wanted to do foils instead of the reusable plastic clips that hold a cotton ball on your nail, just for simplicity. I also needed a triangle cuticle peeler and cuticle pusher, as well as nail files and buffer. This had all of it, and there was even a nice little case for the two metal cuticle tools. The files don't have labels on them so I had to just test out what each side was for, and I wish there were a 240-grit one. They are also extremely cushy which is hard when I just wanted to file a small bit on the side, but they work just fine for starting out. I'll probably add on some more specialty files as I go, but this kit is great as a starter.

4. Pump bottles - $7.45 (optional)
For the acetone and rubbing alcohol, I decided I wanted press-down pump bottles for ease of application, like what my local salon uses. These ones worked great and they actually work. I used my label maker to mark which bottle was which. These aren't required, but they've made things a lot easier, especially with using rubbing alcohol at the end of the manicure process.

5. Cotton pads - $14 (optional)
You can use whatever you want, but I already had these on hand. I use White Rabbit cotton pads for all of my other skincare stuff, they're a K-beauty brand. They come in large folded sheets so I just cut them into quarters for my gel manicures. They're lint free and don't waste product like cotton balls do, so I'll continue using them. They're a little pricey at first but I've had the same box for like 6 months and use them with abandon, and the box is still mostly full. (note Sokoglam.com was out of stock when I posted this, hopefully they'll get more in soon).

6. Acetone and rubbing alcohol - $5
To remove the gel polish from your previous manicure, you need acetone, which I got for $4 at my drugstore. You also need rubbing alcohol to clean the nails before you apply the base coat and after you cure the top coat, which I got for $1 at the dollar store.

And that's all you need for your own at-home gel manicure. Total: $106.45 (plus tax).

Thursday, July 21, 2016

A few of my favorite things

Here are some of my favorite items from my shop:

Friday, July 8, 2016

Making beaded earrings

I thought I'd share what it looks like when I'm making beaded earrings (the ones available in my shop here):


See all of our other earrings and products at the store: Sage & Savvy Soap Co.

Preparing a batch of soap

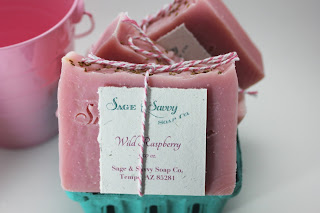
I thought I'd show you how Sage & Savvy Soap Co. prepared our Wild Raspberry Bar Soap:

First, Lindsey made the soap and poured it in the mold, where it processed and hardened for 24 hours:


After she unmolded and cut it, she let the individual bars dry for a few more hours:


Then, Lindsey got out the soap stamp:


After wrapping and tying labels on all of the soaps, we had the final product!


We also made matching lip balm:


See all of our other soaps and products at the store: Sage & Savvy Soap Co.


Thursday, February 25, 2016

Playing the Piano

I have taken a somewhat unplanned hiatus from this blog to focus on school for the past year, but I recently began to get involved with fixing up my home and doing craft projects again. Today I want to share my piano with you. I have a Williams Allegro electric keyboard. It is full-sized and has the same hammer/push feel as regular piano keys. Over the past year, it has spent most of its time holding my mail, but I cleaned and dusted it off last week and got some new equipment for it from Amazon.

The sustain pedal that came with it is crap. It was small and plastic and would slide all over the carpet when I tried to use it, assuming it would even work to begin with. I had no idea until a few days ago that I could buy a new sustain pedal instead of wrestling with the old one, it just didn't occur to me. So I found a new one. I got an M-Audio SP-2, which is a heavyweight pedal that operates just like a standard pedal on a normal piano:


I also purchased a pair of Behringer headphones intended for studio use (I never play the piano without headphones, I often play late at night before I go to bed) and a dust cover. So here is my beautiful piano and all its accessories (all of my music is in the black binders to the left):


My only complaint is that the x-bar of the keyboard stand gets in the way sometimes when I'm using the pedal, but overall, it works so I can't complain. The padded stool is pretty comfortable, but I'm looking forward to upgrading it to a real piano bench sometime.


I have been playing the piano for a long time--since I was 8 years old, and I have always played on regular pianos, so it was an adjustment when I first started playing on my digital one, but it's the only one I really can have with my frequent moving over the past few years. Now though, with my new sustain pedal and headphones, I literally don't notice any difference between my piano and a regular one. And I didn't have to pay big bucks to tune it first.

Friday, January 30, 2015

Soap wrapping

So besides school and this horribly neglected blog, I also run Sage & Savvy Soap Co. While I have branched out into making other items, my primary product is still soap. I have a rather unique wrapping style, if I do say so myself. It originated when because I wanted to get more than just 4-6 soap labels per sheet of paper, which is generally what you get if you're doing a traditional "cigar band" soap label that wraps all the way around with the ends secured together with tape or glue. But I'm a cheapskate and I still wanted to use a rather pricey sustainable paper, so I decided to try and get 8 labels per sheet. (btw, I use Mr. Ellie Pooh paper, made primarily from elephant dung and recycled materials. It's wonderful and I have yet to find any other papers like it).

Of course, getting 8 labels per sheet meant that my labels would not wrap around completely, leaving the top exposed. So I found some twine that I had lying around from another craft project and tied a bow at the top to make it seem like the short label was intentional. This also had a bonus of showing off the rustic, unretouched tops of my soaps. This is how I started wrapping my soap in the beginning, and it is how I continue to do it today.


What many people don't realize though, is that I wrap each soap by hand, one at a time. I've gotten quite fast and can nearly tie the bow at the top with one hand now, but I still do it bar by bar, bow by bow. And that's not even including cutting the twine, designing and filling out the labels, printing them, and hand tearing each one to keep it looking au naturale and rustic.

I recently doubled my standard batch size to 20 full-sized bars and 4 sample bars per batch, with multiple batches at a time, so it's been interesting to have so many soaps to wrap. In the beginning, I used to just wrap 10 bars a week at the most! Tonight, I wrapped 72, and I just about have blisters on my fingers, but it's quite satisfying to see the completed work:


Featured here are Lilac Meadows, Mango Papaya, and Wild Berry Rose.


Thursday, November 27, 2014

The perfect Thanksgiving turkey

Okay, I only got a few pics but I was generally trying to manhandle the turkey instead of take photos at the time, so here is my secret to the perfect turkey.

Phase One: The unwrapping
I had a 9lb Lil Butterball turkey (for 3 people it was perfect). I defrosted it for 3 days, then the night before, I unwrapped it (in the sink), and pulled the neck out of the main cavity. I found a packet of the giblets in the BACK of the turkey, it wasn't in the main cavity, then I rinsed it once and patted it with paper towels.

Phase Two: The "dry brine" or, The salting
I plopped it breast side down on a cookie sheet with a lip, then sprinkled kosher salt all over, plus some very finely ground Himalayan salt (I had previously ground it up in a coffee grinder, so it was very, very fine). I rubbed it into the bird, all over the skin and in all the crevices. Then I flipped it right side up and did the same thing. I then took a sprig of dried rosemary and a few small sprigs of thyme and tucked them into the main cavity. Then I covered the whole cookie sheet with plastic wrap and stuck it in the fridge.

Phase Three: Morning of
The next day (Thanksgiving) around 11am, I pulled out the turkey and rinsed off the excess salt, pulling out the rosemary and thyme also. NOTE: if you do the salting, it IS best to do it for 2-3 days instead of the night before, but I didn't plan right. I rinsed salt off the cookie sheet and plopped the bird back on it, dried it with paper towels, and then prepared my dry rub.

Before the dry rub, I preheated my oven to 325 degrees.

Phase Four: Dry rub
So I did an interesting mix of herbs for my dry rub. It was kind of just by feel. First, I took a mortar and pestle and put in a small handful of dried rosemary, some whole cloves and allspice, some thyme leaves, and dried pieces of orange peel. I didn't grind them completely to a powder, but I did break up all the whole cloves and allspice and generally blend them up a bit. I then mixed this with a delicious seasoning packet that I got in my Love With Food box last month: All Purpose Salt Seasoning Blend by Whole Spice. This seasoning packet is quite flavorful and a bit like a high-end Lowry's seasoning salt, but uses a bit less salt, in my opinion. The packet was 1oz and I mixed it all with the spices I used. I probably would have been fine with a little less though, and I have saved the remainder to use for roasted potatoes later. So I rubbed this mix all over my turkey, bottom first, then the top (like I did with the salt). I did not rub it underneath the skin, however. I am close enough to a vegetarian as it is, I couldn't go that far as to pull the skin up. Then, I put a WHOLE stick of unsalted butter inside the main cavity.

Phase Five: Roasting pan prep
I would recommend getting a real roasting pan with a rack to let the turkey sit raised up from the bottom of the pan. I'm a cheapskate though, so I had one of those single-use pans. I took several lengths of foil and rolled them together to make a large donut shape, probably about the same size as a bratwurst or something. Then I formed a circle and set it in the middle. I set the turkey on it breast side up and slid it into the oven.

Phase Five: Cooking additions
About half an hour in, after the dry rub had started to kind of cook in a little bit (I was "winging it"), I pulled out the turkey and liberally spooned and drizzled rosemary-infused olive oil all over the turkey. I also stuck a meat thermometer into the thigh (I think? I kind of just stuck it into the thick part of the body next to the wings.) Then I placed foil over the whole of the roasting pan and put it back in for another 90 minutes. Then I pulled it out quickly and drizzled more olive oil on. I also removed the foil. It took about another 70-75 minutes after that and then the turkey registered over 165 in all the areas I checked with the instant-read thermometer.

Phase Six: Let it sit
We pulled the turkey out and then let it sit for about 20-25 minutes.

And that was it! We cut it up and the breast meat was the most flavorful, moist delicious thing I have ever eaten. We had forgotten to make the turkey gravy, but we didn't even need it. We hardly needed salt and pepper. We just ate it plain, it was so good! All in all, it took about 3:15 hours to actually cook. For a 9lb turkey, that may seem like a long time, but we just cooked it slow and low at 325 degrees and I'll absolutely do it again.